What is UltraVNC SC? It’s a solution for fast remote-access to a client’s system. It’s free, too.
What’s the difference between UltraVNC and UltraVNC SC? UltraVNC SC takes all of the complexities of setting up a VNC server, and puts the burden on the admin, rather than the client side. Forwarding ports, installing services, setting up passwords, configuring firewalls — all of that is transparent to the client. All the client has to do is double-click a custom *.exe that you set up ahead of time by following this guide.
So, let’s get started.
First, the prep work. You’re the admin, so you need to lock down your local IP and get your ports forwarded appropriately.
1. Determine your local IP. Start > Run > cmd > ipconfig — write down your local IP. Mine is 192.168.1.6. What’s your default gateway? Mine is 192.168.1.1, yours will likely be similar.
2. Log into your router administration panel by navigating to your default gateway address using your browser. (Note: more complex routers may have other methods of getting into the admin panel, check your documentation).
3. Forward port 5500 on your local IP address. (Not to be confused with 5900, the default VNC port — make sure you do 5500).
4. Configure your firewall to allow connections over port 5500 (this is really important, don’t forget!)
Now that you’ve got that all set up, you have a choice to make. You can compile the .exe with your current WAN IP, or you can lock it down using something like DynDNS, similar to the way you normally do with UltraVNC. I strongly recommend you lock it down using DynDNS, and use the DynDNS Updater on your system. So, with that in mind, let’s continue:
5. Head over to the UltraVNC SC “Create” section of their website and download custom.zip.
6. Inside custom.zip, you’ll find 6 files. These files are there for you to customize and then have UltraVNC SC compile them for you in the cloud. You can customize quite a bit with this, but for this tutorial we’re just gonna get the remote access up and running as fast as possible. Once you master this, you can then go back and tweak with all the settings and options and make a very “pretty” UI for your client.
7. Extract custom.zip and open up helpdesk.txt. Inside, you will see a *.ini-like file which contains defaults for all the settings you need to instruct UltraVNC SC what to compile in the final .exe.
8. Under the first [HOST] section (“Internet support”), change the default IP to be your DynDNS (or WAN IP) and be sure to leave the :5500 (port) at the end. Then delete the second [HOST] entry “Internet support encryption” because we won’t be using encryption in this guide. Save the helpdesk.txt file and close.
9. Go ahead and delete the rc4.key file, because we aren’t using encryption right now.
10. Highlight all the files and create a *.zip file. Call it whatever you want (do not have a folder inside of the *.zip, just the data).
11. Now, we need to “compile” the .exe with the UltraVNC SC website. So, head on over to the “Online Creator” section of their site. For reasons unbeknown to me, they require you to use the username: foo, password: foobar. Then upload your newly minted *.zip file.
12. Download the resulting *.exe, which will be named whatever you called your *.zip file.
Now you’re ready to give the *.exe to your client, right? Not just yet — now we have to set up your host computer to “listen” for clients which are going to try to connect to you via port 5500. To get the UltraVNC viewer, you’ll need to have the regular UltraVNC installed, and just choose Viewer if you don’t want the server as well during install.
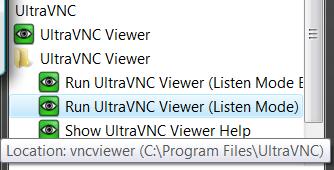
13. With the UltraVNC viewer installed, go to your start menu and find UltraVNC > UltraVNC Viewer (Listen Mode). Run it. When you do, you’ll see a green eye appear in your system tray.
Curiously, this icon is the same color as previous versions of UltraVNC server which would change from blue when idle, to green when connected. Nonetheless, you know it’s in listening mode by just hovering over it. Again, make sure your firewall isn’t blocking anything. If you want to “verify” that the port is listening, open up a command prompt and type netstat -a and check for port 5500 and a status of “Listening.”
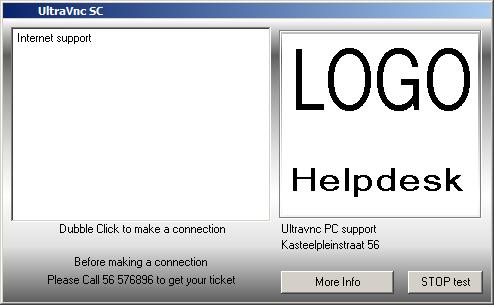
14. With all the aforementioned in place, your clients are ready to connect! Send them your *.exe and it will look like this by default:
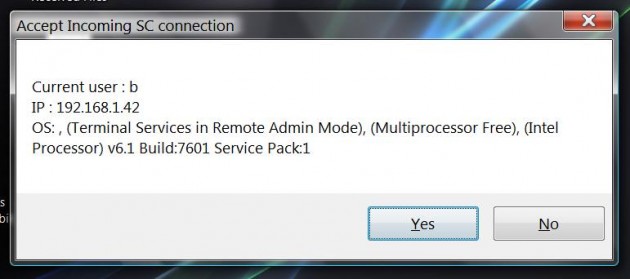
Most aspects of this awkward looking client executable are changeable. You’ll obviously want to change this if you plan to use this seriously. Your client simply has to double click “Internet support” to initiate the connection. When they do, you’ll be presented with a popup that looks something like this:
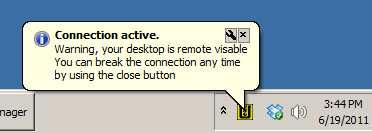
15. Click Yes and you will be able to see their desktop, and your client will be presented with this default, incorrectly spelled message:
Your client can close the connection by right clicking on the VNC icon on his/her system tray, and choosing close. Or you can close it at any time by just closing the UltraVNC Viewer window.
Important: My tests conclude that when doing an UltraVNC SC connection with a client running Windows Vista or 7 with Aero enabled, there is a 15-21 second delay even over lightning-fast connections. This is unacceptable. If you believe your client is running a system with Aero enabled, you must disable it or UltraVNC SC will be nearly unusable! Because your client is in dire need of remote assistance, they probably have no idea what Aero is — so make it easy for them and disable it via a simple batch script on their system which runs the following commands:
net stop uxsms (to disable Aero), and a pause with a message then, net start uxsms (to enable Aero). All you have to do is hit any key in the command prompt window before closing your session!
You will find that with Aero off, the speed is super quick. It seems a lot more complex than it really is with all the steps laid out like this — but it’s really not that bad. Once you’ve got it set up, it’s easy to deploy to all your clients. Good luck!
admin@variableghz.com


Hello there,
I’m new here, and found your very well made How-To.
But I have one question, where do I put the .bat file, so I don’t need to go into cmd and put the commands by hand or smth.,
Sorry, but I’m not an IT specialist, just trying to help my brother via VNC. Because we live in different countries.
Thank’s for your How-To and hope to receive an answer soon.
Put the *.bat file anywhere on the computer, just double click it to run it. You are very welcome!
Excellent! it’s very useful, I added the [direct] option at the end of the file so the user does not have to make any clic, it connects automatically.
I want to learn how to use the repeater on the ultra vnc
Thanks!
Roman — good call. I started using LogMeIn, but they’re getting very cheap with their plans ~ still on the lookout for the ultimate solution.
I was trying to connect to the 5900 port and it was not working.
Reading your post was the solution!
For some reason, UltraVNC (Listen Mode) do not start automatically at VNC 1.1.9.3. You need to put it on “Start” folder in Start Menu to it start automatically.
I never could imagine that we need to use 5500 port and that we need to start UltraVNC in Listen Mode. Things that I could not found at UltraVNC documentation.
Thank you!
My developer is trying to convince me to move to .net from PHP.
I have always disliked the idea because of the expenses.
But he’s tryiong none the less. I’ve been using WordPress on various websites for about a year and am
worried about switching to another platform. I
have heard good things about blogengine.net. Is there a way
I can transfer all my wordpress content into it?
Any help would be really appreciated!
Ammyy Admin is quite useful if you are looking for a remote control program easy to use and do not give you any annoyance to the configuration of ports, firewalls and more.
Hi Samuel
sorry to wake an old thread but it is extremely useful, just a question, is it possible to work the disable aero into the exe perhaps, so when th euser runs the app that it does it automatically?
Thanks
Frank
I’ve been able to get this working. What I’m having trouble with is getting any type of encryption to work with SC.