PC ER: How-To Recover Data from a Damaged SD Card
Situation:
2GB SD card no longer registers as ‘visible’ to the digital camera and is barely readable within the Vista OS.
Potential Loss:
~1.5GB worth of photos and videos of Hong Kong.
Diagnosis:
Download and install PhotoRec. (permanent archive)
Navigate to the ‘win‘ directory and run “photorec_win.exe”
Now, on my laptop here, there are essentially two drives that PhotoRec sees: (1) the hard disk, which can be easily recognized as the larger of the two (160GB); and (2) the SD card which weighs in at an easily-discernible 2002MB (2GB). On a desktop system with many hard drives and devices plugged in, this selection screen can be a little tougher on the eyes — so be sure you are selecting the right media.
Next, PhotoRec will ask you to select the “partition table type”; for our purposes, we’re using an “Intel/PC partition.” On next screen, PhotoRec needs to know which partition you want to scan, whether it be the a specific partition, or the entire disk. The default is for it to do the largest partition, I believe, but just to be sure I instruct PhotoRec to scan the entire volume. The partition selection screen for PhotoRec has the default set for the partition, and not the whole volume, curiously.
With “[Whole disk]” selected, I do not change any options but instead hit Enter to “[Search]” and because I selected [Whole disk]; PhotoRec asks me the filesystem type, I simply select “Other” which was the default which encompasses FAT/NTFS, etc. All normal for an SD card.
Now, as a final measure, PhotoRec asks where you want to save the recovered files. This screen is confusing for most people who are not accustomed to DOS-style screens. So be sure to look through the screen very carefully and slowly — you don’t want to rush this.
I launched PhotoRec directly from my downloads folder in Vista because I am not particularly concerned about the location. I don’t mind if it stores the files in the directory indicated in the photo, so I can just hit Y on my keyboard and let it scan the volume. However, if you did want to change directories, it would be helpful for you to know that two periods (..) in DOS syntax means “up one directory” — So, using your arrow keys, you can navigate through your directory structure in Windows to find the correct place to put your files. All the way to the right of the screen you’ll see, right near the top, two periods. Those periods let you go back all the way to the root of the drive. Also known as \ or simply the drive letter and a colon.
For my purposes, I hit the Y key and just write the files straight in the downloaded location since I will be moving them later with Windows Explorer anyway.
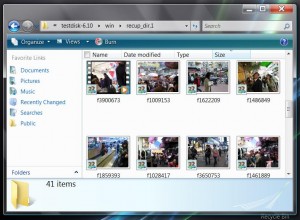
Once completed, it will indicate as such on screen. Simply close or quit from the command prompt window. Assuming you left the defaults in place as I have, the recovered data will be in one or more folders inside of the ‘win‘ directory labeled “recup_dir.*”:
(the recovered data from PhotoRec, deposited into the recup_dir.1 directory)
Scrolling through all 41 files, it appears as though that’s about everything. All photos and videos before the card became corrupt and was no longer readable by the camera or the computer. As such, I will not need to pursue further recovery methods which include but are not limited to, the following applications: (1) Stellar Phoenix Data Recovery; (2) GetDataBack; and (3) EnCase Forensic as a final measure.
Good luck!
admin@variableghz.com


ya um i tihnk mb u need 2 go bak 2 the drawin bored w/ tihs i have NO IDAE WAT UR TALKIN ABUT!?!??????????????????? i tried 2 maek it scan the volume (i have it turned up 2 loud) and nothin hapend?
cool articel but if u try hrader next tiem it wil be beter lol
ps how can i get pass tish stupd blok my mom put on the comptar? i need 2 get in 2 yahoo
I have downloaded photorec_win.exe and followed above steps however the wrong size of SD card appears. My card is only 2 GB but shows on the 25GB. With 3 passes no photos were recovered. What should I do next.
Thanks
You’ll need to try another software recovery method first. Try using the following, in order: (1) GetDataBack; (2) http://www.datarescue.com/photorescue/v3/index.htm
For the second, try their demo — if the demo cannot find anything, then the SD card may be irreparably damaged and you’ll have to resort to one of the paid recovery services I mention in the article above.
Sorry buddy,
VGHz Admin
Thanks so much for the walk through. I was able to get back my photos and videos. However I ran into one problem. It put most of my videos into one rather large file- it now plays as one continuos video- that has no sound. 3 of the videos restored normally. I can deal with the extremely long video containing halloween through easter, but would love to also be able to hear. Any idea what is up or how to get the sound back?
If the memory card is not recognized in the PC or it is impossible to access the data on it, the controller on the card is damaged. There is only one way to get the data back, unsolder memory chips and directly access their raw data with a programable chip reader. Software can’t help, that is a physical damage! Have a look at: [url removed] CF xD SD MMC memory card/stick photo recovery
Nice post. Thanks for sharing these tips.
You write awsome article, bookmarked
I read this piece of writing completely about the comparison of newest and earlier technologies, it’s remarkable article.