
Getting Serious About VNC

Enough. I want you to stop emailing yourself files, telling somebody over the phone where your stuff is, driving back home to turn on your PC to retrieve a file you forgot… Enough is enough. It’s time for a real solution. Rather, a combination of solutions to ensure this problem is eradicated for good — and I mean it!
VNC to the rescue? Yes, provided it is properly configured and secured. In this How-To, you’ll learn how to set up VNC to be your primary, secure, stable and immediately accessible remote data solution. In addition, you’ll also learn how DropBox can make for a fantastic alternative in the event VNC cannot connect or you need more realtime connectivity. Okay, let’s jump right in.
What is VNC, and which “flavor” should I be running?
VNC (Virtual Network Connection) is a powerful tool that enables you to access your remote PC or laptop from a another device anywhere you can get an Internet connection. The benefits are enormous — you can access your data from virtually anywhere! Controlling a remote computer over VNC is generally quite simple, you use your mouse and keyboard just as though you were right in front of that PC. VNC is not simple to set up for everyone, not even for so-called experts.
In addition to its remote computer-to-computer capabilities, some versions of VNC run so quickly that when used over a LAN (Local Area Connection) you can even use a spare laptop or computer as an extra monitor. More on that later.
There are a few “flavors” of VNC — RealVNC, TightVNC and my favorite, UltraVNC. Each has their advantages and disadvantages but in my opinion, UltraVNC has the least disadvantages and has proven to be the most stable and has the most robust feature set of any that I’ve ever used. It’s free and you should consider donating if you find it of great value, as I do. The primary reasons why you should go with UltraVNC over the others are: (1) VNC hook driver, this makes your connection with the remote computer (or LAN) incredibly fast and the display looks amazing; (2) file-transfer utility, this incredible feature is built right into the UltraVNC viewer; (3) ability to send custom keys (and CTRL + ALT + DEL); and (4) extras such as VNC chat and lots more.
Where VNC gets complicated.
Alright. You want VNC at home. VNC needs a few planets to align correctly before it can work: (1) it needs an IP address of the computer you are trying to connect to, known as the “VNC Server”; (2) the VNC Server needs a port to be “forwarded” from your router in order to accept the incoming connection, the defaults for this are 5800 (web, more on that later) and 5900; (3) the VNC Server must be running or the connection will not be accepted; and (4) your firewall must not be blocking the incoming connection.
Seems like a lot? Well, it gets worse. Your ISP (Internet Service Provider) most likely has a dynamic IP (Internet Protocol) set up for you. This means that your IP address changes, (and it eventually will sooner or later) your VNC connection will no longer work if you haven’t taken note of your new WAN (Wide Area Network, or “Public”) IP address. The solution for this is to link your IP address to something that won’t change sporadically. I use the fine folks over at Dynamic Network Services, Inc. They have an amazing array of services, but for the purposes of this How-To I am only focusing on making your dynamic IP “static.” Once you register an account (free or paid, your choice), you then install the DynDNS client, here (permanent archive).
Once you link the DynDNS service to your DynDNS account. It should look something like this on the website:

In my instance, I used the *.getmyip.com url, easy to memorize. There are dozens to choose from. Your system tray should look like this:
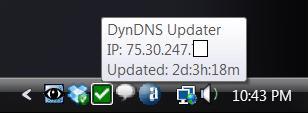
(note: the DynDNS icon may vary, depending on what version you have installed).
Alright. So now we have your IP staticized. Now we can get to installing VNC. As I mentioned earlier, I recommend UltraVNC for the aforementioned reasons. Download their latest version and install it (make sure you get the latest version and the correct one for your operating system).
When you install UltraVNC, you want to be sure to select that it installs as a service. By installing it as a service, you will be able to lock your screen in Windows thereby allowing for another layer of security. Moreover, having the UltraVNC server as a service enables you to use extra features like being able to send Control Alt Delete to the host machine, chat, file transfer, and the ability to kill Explorer.exe in the event a problem arises. Don’t forget this crucial step.

(UltraVNC Server running as a service. To access services, hold down the Windows Key and press R for Run, then type services.msc)
Once UltraVNC is installed properly you will see the blue eye in your system tray. Set a password, preferably one that differs from your Windows password so that when you walk away from your computer, you can lock your PC for added security. (You can “lock” your PC by holding down the Windows Key on your keyboard, and tapping L simultaneously.)
So, we got UltraVNC ready to rock; we got DynDNS up and runnin’; now, we need to check out your port situation. We know that the VNC defaults use port 5900, so that port needs to be open and ready to accept connections. I cannot walk you through specific firewall issues because I have no idea what kind of firewall you are using — so, read you manual, ask your tech, do somethin’ but make sure it isn’t messing with your VNC connection. (note: you can check open ports by going to the command line, and typing netstat -a)
Next, if you are using a router (and you likely are), your port needs to be “forwarded.” If you are not familiar with this terminology, listen up. A router in your home allows multiple users to connect to one Internet connection. This is made possible by local IP addresses. On linksys routers, the default local IPs are usually something like this: 192.168.1.2. The first computer you plug into the router will be automatically configured to the “lowest” local IP address. So, the next computer would then be 192.168.1.3, for example. If you turn off your computer from time to time (you’ll have to restart once in a while for updates, etc.) then your local IP may change, thereby disrupting your local IP “forwarding” — major problem for consistency.
Every Internet connection on the Internet has an IP address, you can think of this is a license plate on a car. Each “person in the car” is a computer connected to the router with a local IP address.
Still confused? Stay with me. We’re first gonna lock down your local IP address to something that doesn’t move. But in order to do that, we need to gather some information first. We need to know your DNS servers, and your default gateway (router IP address).
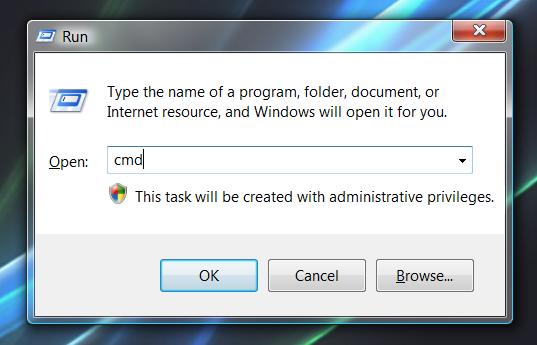
Hold down the Windows Key on your keyboard, and press R to bring up the Run dialog box. Type cmd and press enter. CMD is, as far as I know, short for “command,” since the command prompt is where you, well, type commands. For a while (in XP I believe) you can type cmd or command to execute the command prompt. In Vista, you can only type cmd.
At the command prompt, type IPConfig /all and press Enter. Make sure you use a forward-slash. Know the difference, this is a forward slash /, and this is a backslash \. Don’t confuse the two. In this particular case it doesn’t matter, but other times it will.
Take note of the following information:
– Default Gateway
– Both DNS Servers
– Your current Local IP address
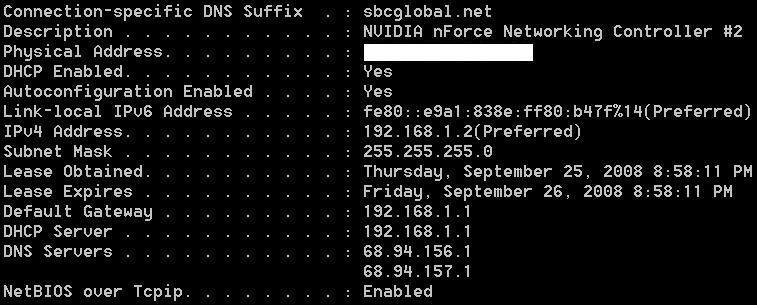
So now we have that information written down. Notice how my local IP address is 192.168.1.2? As I mentioned before, that’s a problem — so let’s dive in and change that. You’ll need to get to the “Properties” of your Network connection. This is tricky to explain, because it varies depending on what OS you’re using. In Vista Ultimate x64 which I happen to use, you get to it by going into the Control Panel and navigating to the Network Connections, right click on your Network Connection, select Properties, double-click on Internet Protocol Version 4 and then you’ll see the IPV4 Properties dialog box which should look like this:

So, notice how I typed in my own local IP address? I chose 192.168.1.8, this decreases my chances of running into an IP address conflict with another computer or mobile device connected to my router. My Default Gateway is the IP address of my router, and the DNS Servers match the data we got from the IPConfig /all. Still with me? Terrific. Let’s move on.
Now with our local IP address in place, we can connect to our router and forward our local IP to the WAN IP. Remember, the WAN IP is the IP address that is available to the public (I use www.whatismyip.com to find out what my WAN IP address is, simply because that domain name is incredibly easy to memorize). The DynDNS takes care of updating your local IP to the static web address (whatever.getmyip.com, for example) and the forwarding enables the incoming connection from port 5900 to “pierce” through the local IP and get straight to your computer. So we need to tell the router “when something tries to access computer 192.168.1.8 on port 5900, please let go through.” Make sense?
Since all versions, makes and models of routers vary, I cannot give you specific instructions on how to go about doing this. I will show you what my Linksys router looks like when forwarded properly as an example:
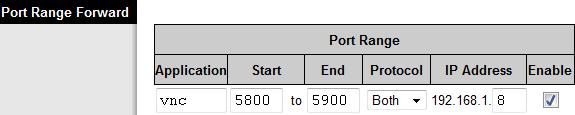
So now my router knows how to deal with my local IP correctly. Now, when I boot up the UltraVNC viewer from anywhere, I can connect to the static web url that I chose from the DynDNS and connect through to my computer 99% of the time without any problems.
Remember, VNC isn’t foolproof. A power outage, system failure, bluescreen, a change in DNS servers, or any other kind of problem can cause your VNC connection to fail. In the event this happens and you cannot connect to VNC, you need a backup plan. DropBox is that backup plan and so much more.
![]()
Enter Dropbox. In a nutshell, Dropbox is a piece of software that runs on your computer, it links itself to a folder entitled, “My Dropbox” which automatically syncs any data you put into that folder with other computers that you “link.” Some of you might be thinking “so? I use livemesh” or whatever other cloud based storage solution. Well, I am here to tell you to forget about the rest, Dropbox is the one to beat — performance is incredible, the whole process is very well considered, seamless and stable.
My advice to you is simple. Install Dropbox. Get your account sync’d up. Make a shortcut to Dropbox on your desktop like so:

When you make changes to any files inside of the Dropbox folder, the changes are replicated to the Dropbox servers and then when any other computers which are linked to your Dropbox account are turned on, immediately sync as well. Since the files are actually downloaded, you can access them even if your Internet connection is down at a later time:

Dropbox notifications are non-intrusive and informative. With Dropbox and VNC configured properly, your files are always at hand. VNC can be used on a variety of clients, including mobile phones, this can be very handy if you need to do something while you’re not at a computer. If you have a modern smartphone you should look and see if there is a VNC client for it.
admin@variableghz.com
12 Responses
to “Getting Serious About VNC”
2 Trackback(s)
- Sep 29, 2010: Windows Home Server is Incredibly Awkward | VariableGHz
- Jun 20, 2011: How-To: Make Use of UltraVNC SC (Single-Click) | VariableGHz
Thank you for this explanation, it worked great.
could u explain a little more on how to do the file transfer with ultravnc?
Your information in re tightVNC is incorrect.
Always had native ctr-alt-del, file transfer and much more.
Extremely easy to set up and works like a charm in secure connections whether
ssh, ssl,stunnel, putty: what have you.
pues la neta gracias he esto me ayudo demsiado ojala explicaran todo asi
Mr. Garoo,
Thanks for your comment. I didn’t say that TightVNC does not have those features, but rather UltraVNC has the least disadvantages and in my opinion is the most stable of the VNC flavors. Moreover, the last time I tested TightVNC, which admittedly was a long time ago, it lacked numerous features such as the chat, file-transfer, ability to send custom-keys, etc. I apologize if this information seems incorrect, but note that I did not state that TightVNC lacks these features but only that UltraVNC does in fact have them and they work well.
I tried all day long to get this working.
I use a brand new Router Netgear DGNB2100 with insuccess.
I tried to open and forward all port.
I opened also all VNC ports using UPnP port mapping software and… nothing again.
When I connect with the client to server it fail.
I’m getting crazy I’m start thinking probably is the brand new router that may have some firmware problems.
:(
x7ftsqff3391zypc
Hello,
Thank you for your information.
I still have a question. But I will explain my “server situation” first.
I have a server at a location which I normally never visit. I use VNC Viewer to acces this server using the IP adress. The IP adress is dynamic. When it has changed, I have to travel to my server connect a monitor, look at the new IP adres and go home again.
I’ve now made a dyndns account and installed the dyndns client on my server. I’ve also linked the service to the dyndns account, and I can connect to my server by entering the hostname.
But:
When the IP-adress of the server will change again, will these Dyndns tools update my IP-adress automatically. So that I can still connect to my server using the hostname?
And if not, how can I make it possible that I don’t have to travel to my server every time the IP-adress has changed?
Thank you!
Hey there,
That’s precisely the reason for DynDNS and UltraVNC! By default, DynDNS will check for a change in your IP every 5 minutes, if there is a change, it will make an update to the hostname. By default, it will “force” an update within 25 days. You shouldn’t have to manually deal with your IP ever again.
I am glad you’re able to use DynDNS and VNC together in this way. It’s a near-perfect solution.
-Admin
Nice!
So, the first time the IP-adress of the server will change, I will notice if I configured it all the right way. That will be the first time I will be happy with a change of IP-adress!
Thanks!!